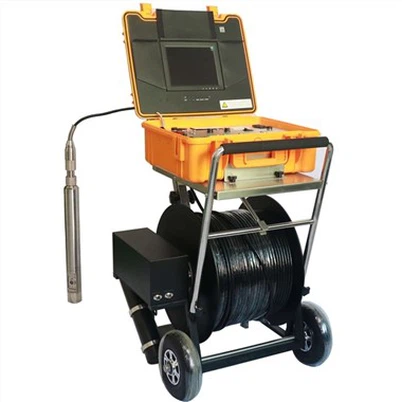

How do I install a snake camera (if required)?
Leave a message

Hey there! As a snake camera supplier, I often get asked how to install these nifty devices. Whether you're a DIY enthusiast looking to check out your plumbing or a professional in the inspection business, installing a snake camera can be a game-changer. In this blog post, I'll walk you through the process of installing a snake camera if it's required.
Why You Might Need to Install a Snake Camera
First off, let's talk about why you'd even need to install a snake camera. Snake cameras, also known as borescopes, are used for inspecting hard-to-reach areas. They're super handy for checking inside pipes, ducts, walls, and even engines. If you're dealing with plumbing issues, like clogs or leaks, a snake camera can help you pinpoint the problem without tearing up your walls or floors. And if you're in the home inspection or industrial inspection business, a snake camera is an essential tool for getting a clear view of what's going on inside structures.
What You'll Need
Before you start the installation process, you'll need to gather a few things:
- Snake Camera: Obviously, you'll need a good-quality snake camera. We offer a wide range of options, including the 360 Degrees Rotation Pipe Inspection Camera, which gives you a full view of the inside of pipes.
- Power Source: Most snake cameras come with a built-in battery or can be powered via USB. Make sure you have a charged battery or a power outlet nearby.
- Access Point: You'll need to find a suitable access point to insert the snake camera. This could be a cleanout port on your plumbing system, an opening in a wall, or a hatch on an engine.
- Lubricant (Optional): If you're inserting the camera into a tight space or a pipe, a little lubricant can help the camera glide through more easily.
Step-by-Step Installation Process
Now that you have everything you need, let's get started with the installation process.
Step 1: Prepare the Camera
Before you insert the camera, make sure it's in good working condition. Check the battery level if it's a battery-powered camera, or connect it to a power source if it's USB-powered. Turn on the camera and make sure the display screen is working properly. You should see a clear image of whatever the camera lens is pointed at.
Step 2: Locate the Access Point
Next, you'll need to find the access point where you'll insert the snake camera. If you're inspecting a plumbing system, look for a cleanout port. Cleanout ports are usually located near the main drain line or in areas where clogs are likely to occur. If you're inspecting a wall or a duct, look for an opening or a vent that you can use to insert the camera.
Step 3: Insert the Camera
Once you've located the access point, it's time to insert the camera. Gently feed the camera cable into the access point, being careful not to kink or damage the cable. If you're using a lubricant, apply a small amount to the tip of the camera before inserting it. As you insert the camera, pay attention to the display screen to make sure you're getting a clear view of the inside of the pipe or structure.
Step 4: Navigate the Camera
Once the camera is inserted, you can start navigating it through the pipe or structure. Most snake cameras come with a joystick or a remote control that allows you to move the camera up, down, left, or right. Use the joystick or remote control to explore the area and look for any signs of damage, blockages, or other issues.
Step 5: Record or Take Photos (Optional)
If you want to document your findings, most snake cameras come with a built-in recording or photo-taking function. You can use this function to record a video or take a photo of any issues you find. This can be useful for sharing with a plumber, a contractor, or a client.


Step 6: Remove the Camera
Once you're finished inspecting the area, carefully remove the camera from the access point. Make sure to clean the camera and the cable before storing it. You can use a soft cloth or a mild cleaning solution to clean the camera and the cable.
Tips and Tricks
Here are a few tips and tricks to help you get the most out of your snake camera installation:
- Use a Bright Light: If you're inspecting a dark area, like inside a pipe or a wall, use a bright light to illuminate the area. This will help you get a clearer view of the inside of the pipe or structure.
- Take Your Time: Don't rush the installation process. Take your time to insert the camera carefully and navigate it through the pipe or structure. This will help you avoid damaging the camera or the cable.
- Be Patient: Inspecting a pipe or a structure can take some time, especially if you're looking for a specific issue. Be patient and keep exploring until you find what you're looking for.
- Test the Camera Before Use: Before you start using the camera, test it to make sure it's working properly. This will help you avoid any issues during the inspection process.
Other Snake Camera Options
In addition to the 360 Degrees Rotation Pipe Inspection Camera, we also offer other snake camera options, including the Best Pipe Crawler Robot and the Pipe Inspection Crawler Robot. These robots are designed to crawl through pipes and other structures, giving you a more detailed view of the inside of the pipe or structure.
Contact Us for Purchasing and洽谈
If you're interested in purchasing a snake camera or have any questions about our products, feel free to reach out. We're here to help you find the right snake camera for your needs. Whether you're a homeowner looking to fix a plumbing issue or a professional in the inspection business, we've got the products and expertise to assist you.
References
- General knowledge on snake camera installation and usage from industry experience.