How do I clean a sewer camera after use?
Leave a message
Hey there! As a supplier of sewer cameras, I often get asked about how to clean these nifty gadgets after use. Cleaning your sewer camera properly is super important. It not only keeps your camera in tip - top shape but also ensures accurate inspections and a longer lifespan for your equipment. So, let's dive into the process of cleaning a sewer camera.
First off, before you start cleaning, make sure the camera is turned off. Safety first, right? You don't want to risk any electrical issues while you're handling the device in a wet or dirty state.
Step 1: Initial Visual Inspection
Take a good look at the sewer camera. Check for any obvious debris, like big chunks of dirt, mud, or even sticks that might be stuck on the cable or the camera itself. Sometimes, you can just pick off these larger pieces by hand. This initial inspection gives you an idea of how dirty the camera really is and what kind of cleaning approach you'll need.
Step 2: Cleaning the Camera Head
The camera head is the most crucial part as it captures all the images. You can start by using a soft - bristled brush, like a toothbrush. Gently brush away any dirt or grime from the lens. Be really careful with the lens because any scratches can mess up the image quality.
Next, prepare a mild cleaning solution. A mixture of warm water and a little bit of dish soap usually works great. Dip a clean, lint - free cloth into the solution and wring it out so it's just damp. Wipe down the camera head, including the lens, the housing, and any other exposed parts.
After wiping, rinse the camera head with clean water. Make sure you get rid of all the soap residue. Then, use a dry, clean cloth to pat it dry completely. You don't want any moisture left on it, as it could cause corrosion or other damage over time.
Step 3: Cleaning the Cable
The cable on the sewer camera can get pretty dirty. It's been dragged through all sorts of gunk in the sewers. First, lay the cable out in a long, straight line. This makes it easier to clean and also helps you spot any potential damage.
Use the same mild soapy water solution for the cable. You can pour a bit of the solution into a bucket and drag the cable through the water. As you do this, use the soft - bristled brush to gently scrub the cable. Pay special attention to any areas where dirt seems to be particularly stubborn.
Once you've scrubbed the whole length of the cable, rinse it thoroughly with clean water. You might want to use a hose if the cable is really long. After rinsing, use a dry cloth to wipe down the cable. Start from one end and work your way to the other, making sure it's completely dry.
Step 4: Drying the Camera and Cable
After the initial drying with a cloth, it's a good idea to let the camera and cable air - dry completely. You can hang the cable up and place the camera in a well - ventilated area. This helps to make sure there's no leftover moisture.
If you're in a hurry, you can use a low - heat setting on a hair dryer. But be very careful not to get it too close to the camera or cable, as excessive heat can damage the components. Keep the hair dryer at a safe distance and move it around constantly to evenly dry the equipment.
Step 5: Checking for Damage
Once everything is dry, give the sewer camera another inspection. Look for any signs of damage, like cuts in the cable or cracks in the camera housing. If you notice any issues, it's important to address them right away. You can either repair the damage yourself if it's minor or contact a professional for more serious problems.
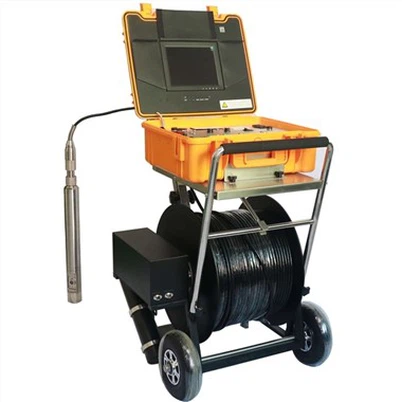
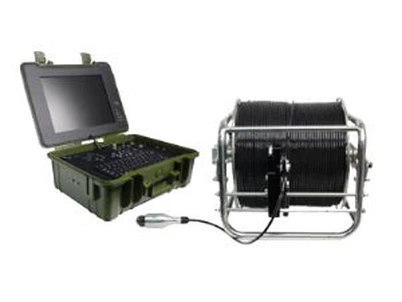
Now, I know some of you might be thinking about more specific types of sewer cameras we offer. We have a great range, including the Borewell Inspection Camera, which is perfect for borewell inspections. It's designed to handle tough conditions and provide clear images.
Another awesome option is the Underwater dual view borescope inspection camera. This camera gives you a dual - view, which is really handy for getting a comprehensive look at what's going on in the sewers or other underwater areas.


And if you need a camera with a flexible cable, our Flexible Cable Industrial Borehole Camera is the way to go. It can easily navigate through tight spaces and provide excellent imaging results.
Cleaning these cameras is similar to the general process I described earlier, but you might need to be a bit more careful due to their specialized features.
If you're in the market for a high - quality sewer camera or want to learn more about our products, don't hesitate to reach out. We're here to answer all your questions and help you find the perfect camera for your needs. Whether you're a professional plumber, a maintenance crew, or just someone who needs to do some occasional sewer inspections, we've got the right camera for you.
Cleaning your sewer camera regularly is a small investment of time that can save you a lot of money in the long run. It ensures that your camera keeps performing at its best and lasts for years to come. So, follow these steps and keep your sewer camera in great condition.
Let's work together to make your sewer inspection jobs easier and more efficient. If you have any questions or are interested in purchasing our sewer cameras, just connect with us. We're eager to hear from you and assist you with all your camera - related needs.
References
- General knowledge about sewer camera maintenance from industry experience
- Manufacturer's guidelines for the care and cleaning of sewer cameras