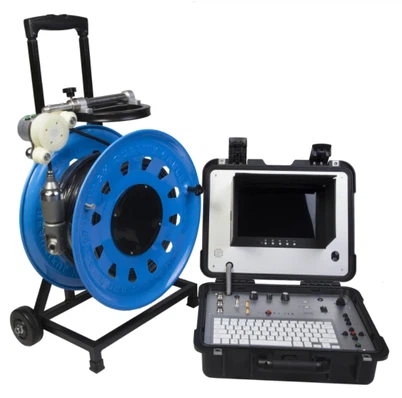

How do I repair a drain camera?
Leave a message

Repairing a drain camera can be a complex yet rewarding process, especially when you're a supplier in the industry. As someone deeply involved in the drain camera business, I understand the importance of keeping these essential tools in optimal working condition. In this blog post, I'll share my insights and practical steps on how to repair a drain camera effectively.
Common Issues with Drain Cameras
Before delving into the repair process, it's crucial to identify the common problems that drain cameras may encounter. Over the years, I've dealt with various issues, and some of the most frequent ones include cable damage, camera head malfunction, and control unit problems.
Cable damage is a prevalent issue due to the rough environment in which drain cameras operate. The cables are often exposed to sharp edges, chemicals, and mechanical stress, leading to cuts, frays, or breaks. This can result in a loss of signal transmission, affecting the camera's functionality.
Camera head malfunction can occur due to water ingress, lens damage, or electronic failures. Water can seep into the camera head, causing corrosion and short - circuits. A damaged lens can distort the image, making it difficult to inspect the drain accurately.
Control unit problems may include issues with the display screen, buttons, or power supply. A cracked display can make it hard to view the footage, while malfunctioning buttons can prevent proper operation of the camera.
Tools and Materials Needed
To repair a drain camera, you'll need a set of basic tools and some specific materials. Here's a list of what you'll typically require:
- Soldering Iron and Solder: For repairing electrical connections.
- Multimeter: To test the electrical continuity and voltage.
- Cable Strippers and Cutters: For working on the camera cables.
- Screwdrivers: Various sizes to open the camera housing and control unit.
- Replacement Parts: Such as cables, camera heads, display screens, and buttons. You can find high - quality replacement parts for different types of drain cameras. For example, the Drilling Inspection Camera Waterproof 30 Bar and the 5000m Depth Oil Inspection Camera have specific parts that can be sourced for repair.
- Waterproof Sealant: To prevent water ingress in the camera head and other vulnerable areas.
Step - by - Step Repair Process
1. Inspection
The first step in any repair process is a thorough inspection. Start by visually examining the drain camera for any obvious signs of damage, such as a broken cable, cracked lens, or loose connections. Check the control unit for any visible damage to the display or buttons.
Use a multimeter to test the electrical continuity of the cables. Disconnect the cable from the camera head and the control unit and measure the resistance between the different conductors. If the resistance is infinite or significantly higher than normal, there may be a break in the cable.
2. Cable Repair
If you've identified cable damage, the next step is to repair it. First, use cable strippers to remove the damaged section of the cable. Make sure to strip the insulation carefully to expose enough of the conductors for soldering.
Once the conductors are exposed, clean them with sandpaper or a wire brush to remove any oxidation. Then, tin the conductors by applying a small amount of solder to them.
Align the new cable section with the existing cable and solder the conductors together. Make sure the soldering joints are strong and free of shorts. After soldering, cover the joints with heat - shrink tubing and use a heat gun to shrink it in place. Apply a layer of waterproof sealant around the repaired area to protect it from moisture.
3. Camera Head Repair
If the camera head is malfunctioning, you may need to disassemble it for further inspection. Use a screwdriver to remove the screws holding the camera head housing together. Be careful not to lose any small parts.
Inspect the lens for damage. If it's scratched or cracked, you can replace it with a new one. Make sure to clean the lens and the interior of the camera head before reassembling it.
Check the electronic components inside the camera head for any signs of water damage or corrosion. If there are corroded parts, you may need to clean them with isopropyl alcohol and a soft brush. In some cases, you may need to replace the damaged components.
Once you've completed the repairs, reassemble the camera head and make sure it's properly sealed. Apply a layer of waterproof sealant around the edges of the housing to prevent water from getting in.
4. Control Unit Repair
For control unit problems, start by opening the housing using a screwdriver. Check the display screen for any visible damage. If it's cracked or not displaying properly, you may need to replace it.
Inspect the buttons for any malfunctions. You can clean the buttons with a contact cleaner to remove any dirt or debris that may be causing the problem. If a button is broken, you can replace it with a new one.
Check the power supply connections and the internal circuitry for any loose connections or damaged components. Use a multimeter to test the voltage at different points in the control unit. If you find any issues, repair or replace the damaged parts as needed.


Testing the Repaired Drain Camera
After completing the repair process, it's essential to test the drain camera to ensure that it's working properly. Connect the camera to the control unit and power it on. Check the display screen to see if the camera is transmitting a clear image.
Lower the camera into a test drain or a bucket of water to simulate real - world conditions. Check the camera's movement and zoom functions to make sure they're working correctly. If there are any issues, go back and re - check the repairs.
Preventive Maintenance
To reduce the frequency of repairs and extend the lifespan of your drain cameras, it's important to implement preventive maintenance. Here are some tips:
- Proper Storage: Store the drain camera in a dry and clean place when not in use. Avoid exposing it to extreme temperatures or humidity.
- Regular Cleaning: Clean the camera head and cables after each use to remove any dirt, debris, or chemicals. Use a soft brush and a mild cleaning solution to clean the camera head.
- Inspection: Periodically inspect the drain camera for any signs of wear and tear. Check the cables for frays, the camera head for water ingress, and the control unit for any malfunctions.
Conclusion
Repairing a drain camera is a skill that can save you time and money in the long run. By understanding the common issues, having the right tools and materials, and following the proper repair process, you can keep your drain cameras in excellent working condition. As a drain camera supplier, I'm committed to providing high - quality products and support. If you're interested in purchasing drain cameras or have any questions about repair and maintenance, feel free to contact us for a detailed discussion. We also offer a range of related products, such as Underwater Led Lights 6000 - 7000LM, which can enhance the performance of your drain inspection.
References
- Professional Drain Camera Repair Manuals
- Industry - specific Technical Articles on Drain Camera Maintenance and Repair